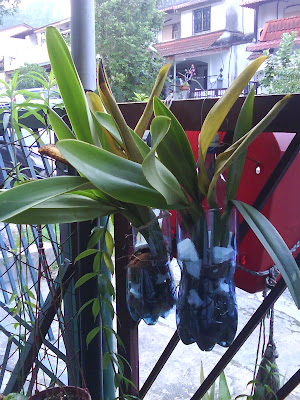
I don't believe myself that I managed to sum-up my confidence and create my own idealistic plant growth which I have managed to use based on recycle materials. It did take me quite some time to assemble the whole thing but somehow I felt its worth it.
This is my second set, the first one was successful. I did the same thing for it - setting it on a temporary bottled type pot, once it gave the new shoots, I had transferred them and its growing well in a permanent placed pot (Cattleya orchid-part 1)
Materials :
1) A plastic bottle (transparent types like the soft drink types)
2) A sharp penknife & scissors
3) Few coconut shell and husk (got it from a sundry shop - they give it away free)
4) Styrofoam (I got it from a furniture shop - normally they throw it away)
A) First cut and make holes at the bottom of the bottle, be careful as it is very slippery and you may cut your hand. Once you manage to make a hole, use the scissors to make the hole bigger.
(Big enough for the water to flow out but small enough to keep the materials inside)
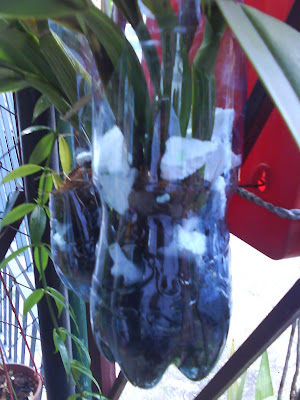
Its important to use a transparent type as you can see the development of the roots time to time.If it starts to rot, you may able to remove everything immediately (but you can do so only when you can see it - that's why transparent bottle or pot helps)
B) Then cut a "C" shape, like making a window at the side top of the bottle.
C) Place the husk first
(so that all the small particles will be trapped and not washed off when watering)
Then, place small pieces of charcoal and coconut shell (I had hammered it to small pieces)
D) Place the orchid bulbs inside carefully. then finally place the Styrofoam to tighten the plant so that it would not be shake.
E) Tie the bottled pot up with string or wire or band and secure it in a semi shaded area.
F) Water daily. Pour the water from top to bottom. The water must flow easily without holding any water. If the water flow is slow then it means the hole place at the bottom is too small or there is too many small materials that may have caused the water to get stuck.
(very important: There must not be any water retention at the bottom of the bottle - not good for the plant and it may cause mosquito to breed)
Do not be concerned when some of the leaves turn yellow, as you are more interested in the new shoots that is being produced by the bulb sides. It may take few weeks to few months to see the progress. Once the whole plant developed its new shoots, replant to a better pot. (This one is just temporary - unless you like the innovative bottled plant)
What is need to watch out for is bulb rot, it happens when the plant is placed on soggy composite material. Remove everything and let it dry-out and redo it again if the bulb is not damaged.


No comments:
Post a Comment